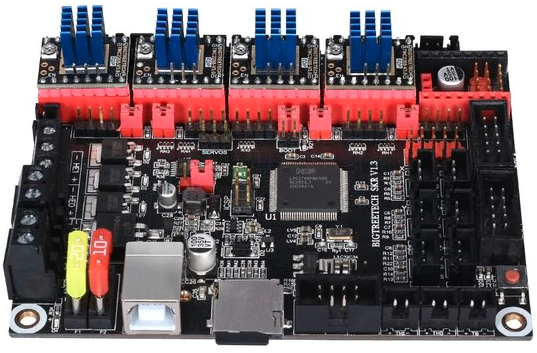
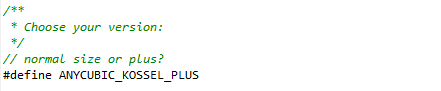
Anycubic Kossel SKR 1.3 upgrade
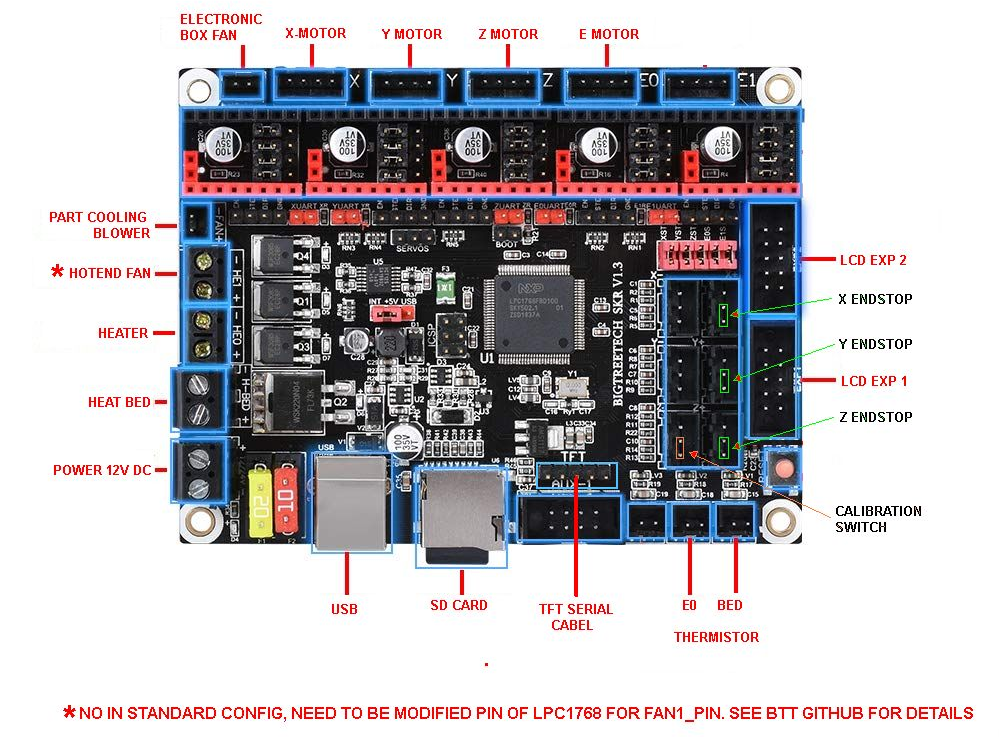
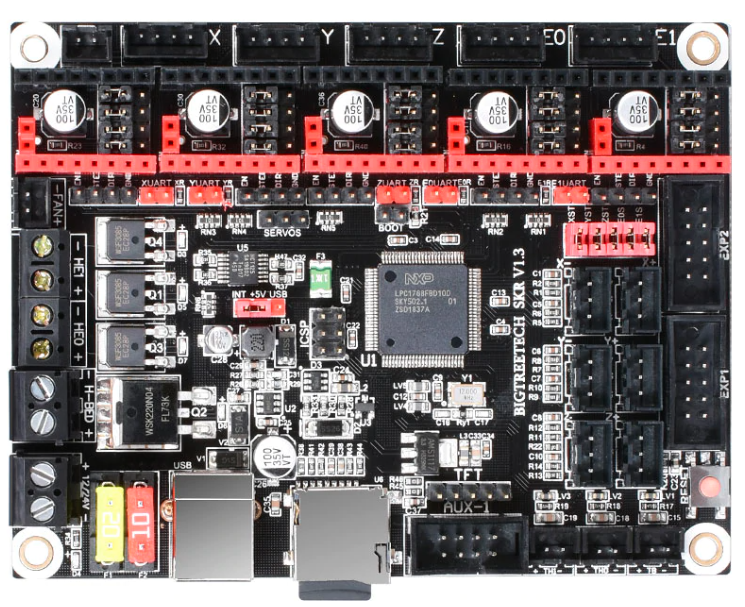
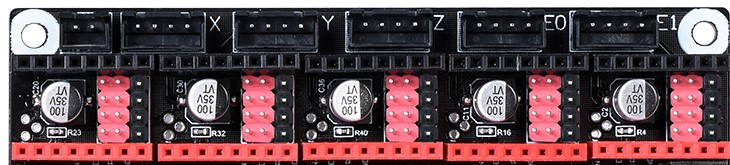
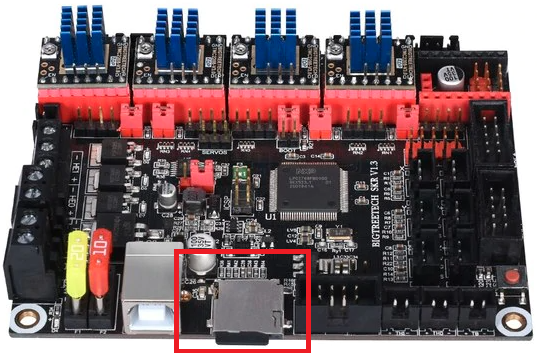
SKR 1.3 32-bit board
Order this board for 16 USD.
Select this option: The board
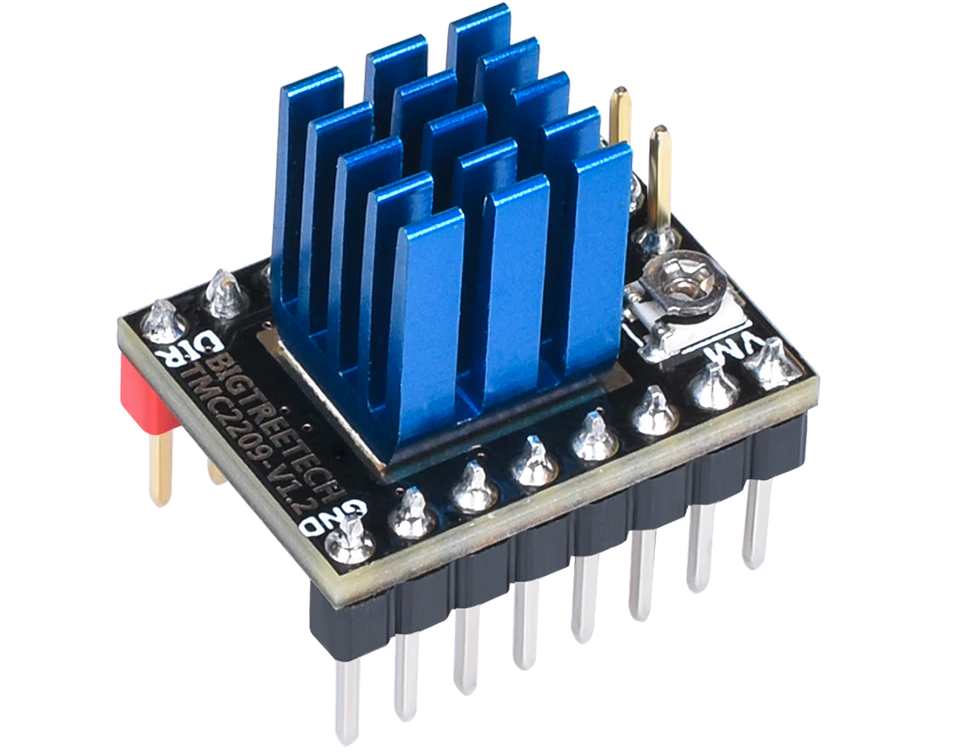
TMC2209 UART V1.2 drivers
TMC2209 drivers provide higher current than TMC2208 - 2A RMS and 2.8A peak. However we usually use cca 0.8-0.9A for X,Y,Z steppers and 0.9-1A for extruder, so the only advantage you can use is smaller inner resistance, so the drivers do not create so much heat as TMC2208.
This leads into a less change of losing steps.
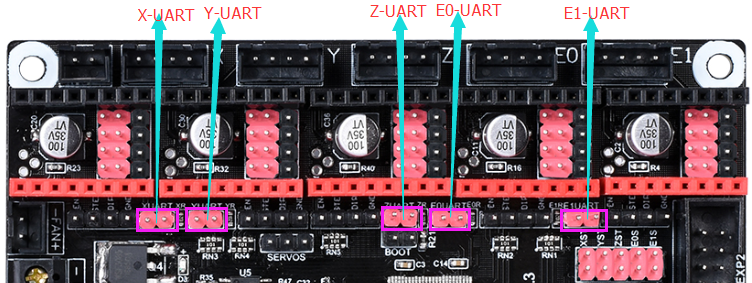
Please do not forget to select this option: 4PCS UART
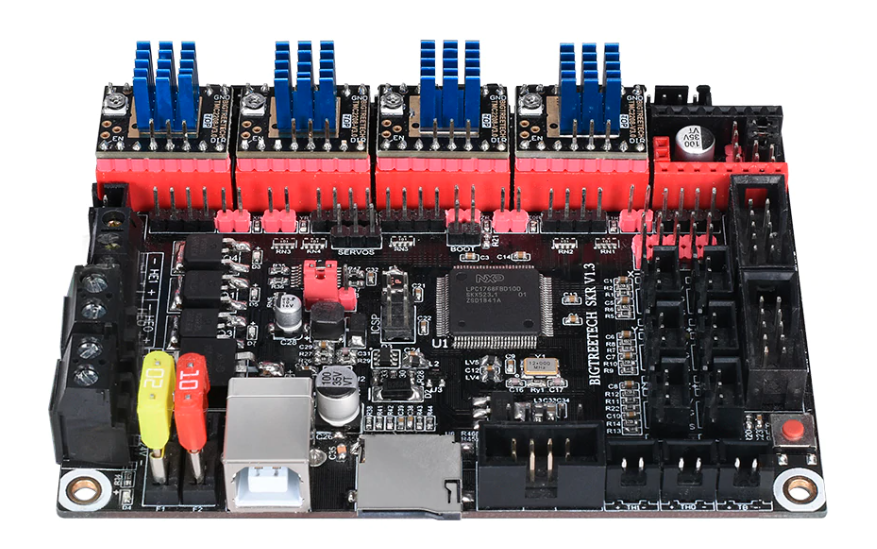
SKR 1.3 32-bit set with TMC2208 V3.0 UART drivers
BigTreeTech provides awesome set of SKR 1.3 32-Bit Board with 5x TMC2208 UART drivers for 32 USD.
It is cheaper to order this set and have one TMC2208 as spare.
Please do not forget to select this option: With TMC2208 UARTx5.
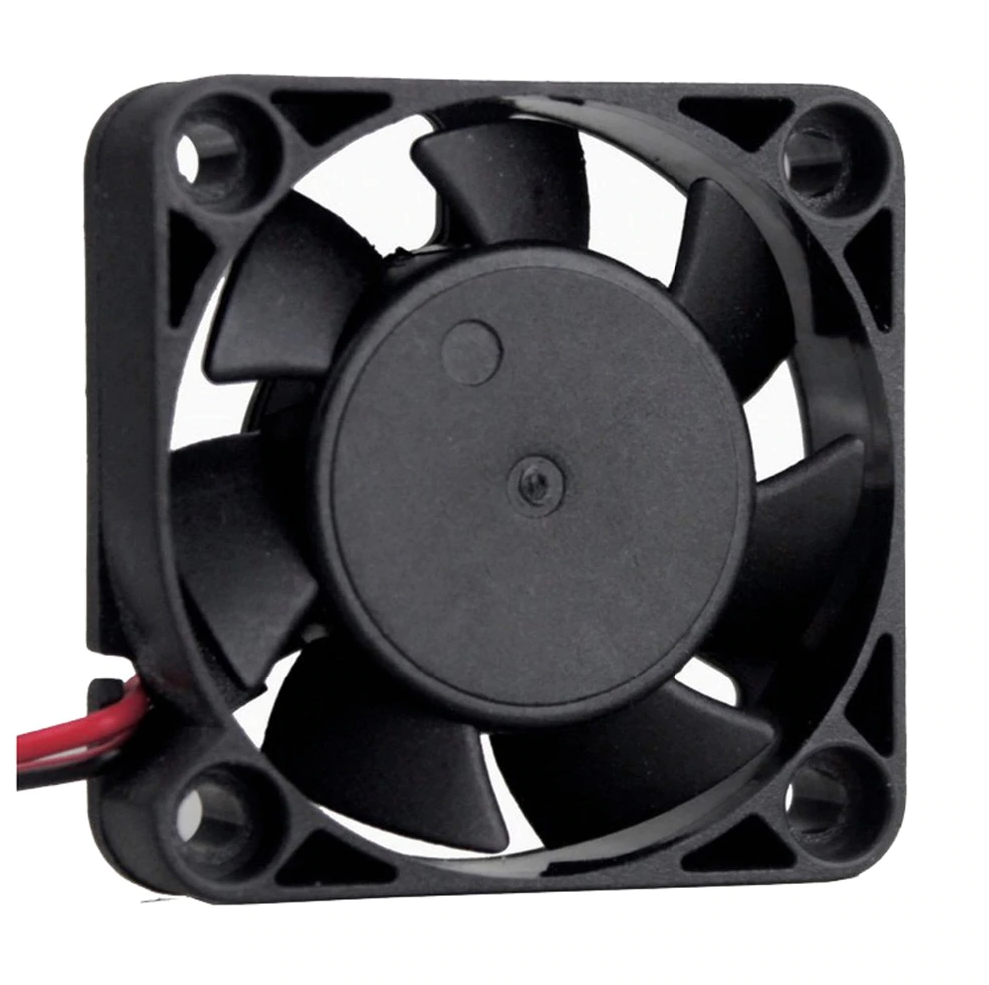
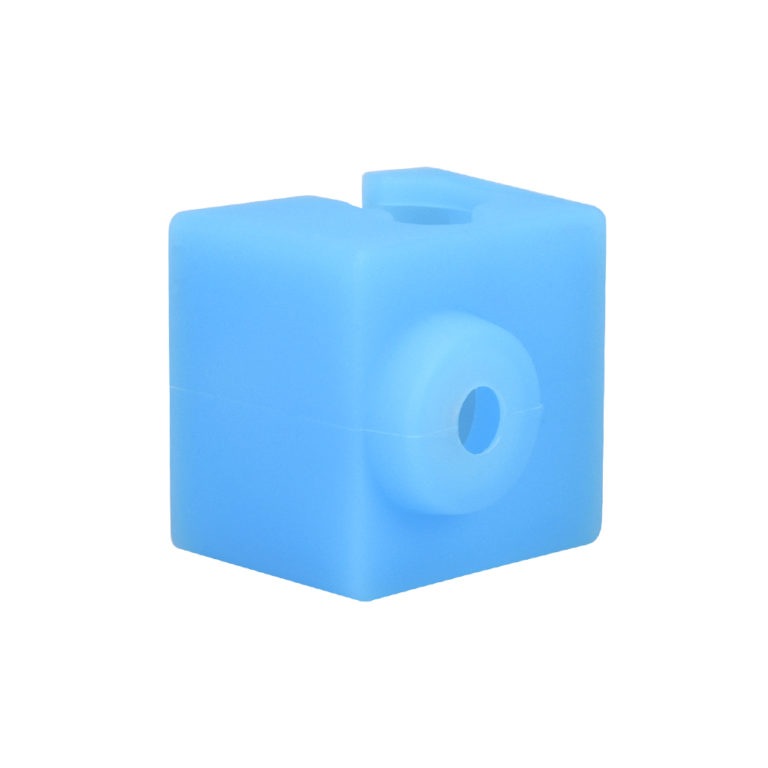
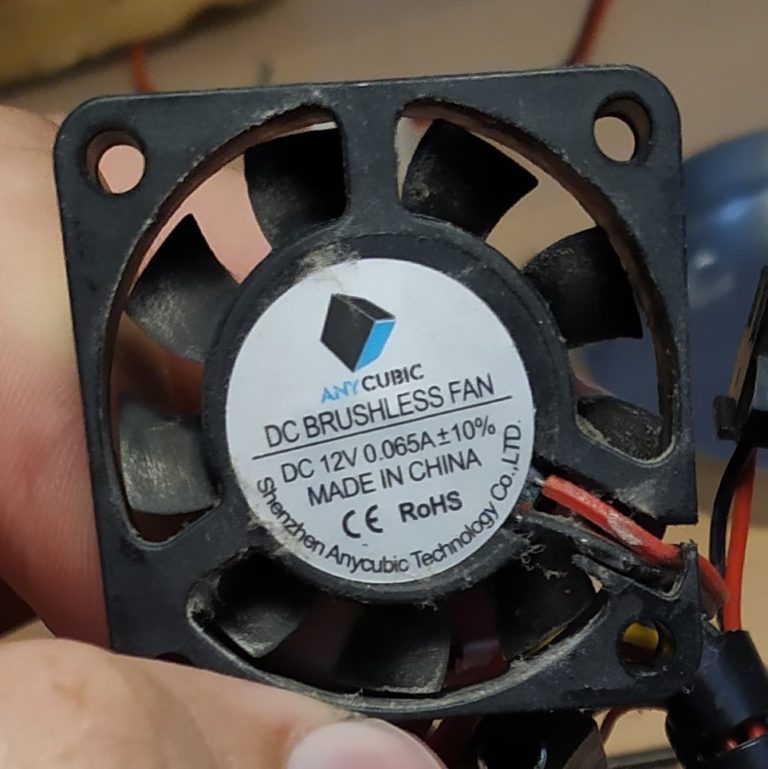
Driver fan GDstine 12V 6500RPM
TMC drivers need active cooling, please do not forget to order this fan.
I have tried to choose the best type with correct connector for SKR unit.
These are of the best-selling fans for 3D printers.
This type produces only 27.6dBA with 7.13CFM.
Please do not forget to select this option: 12V Two Ball 6500RPM
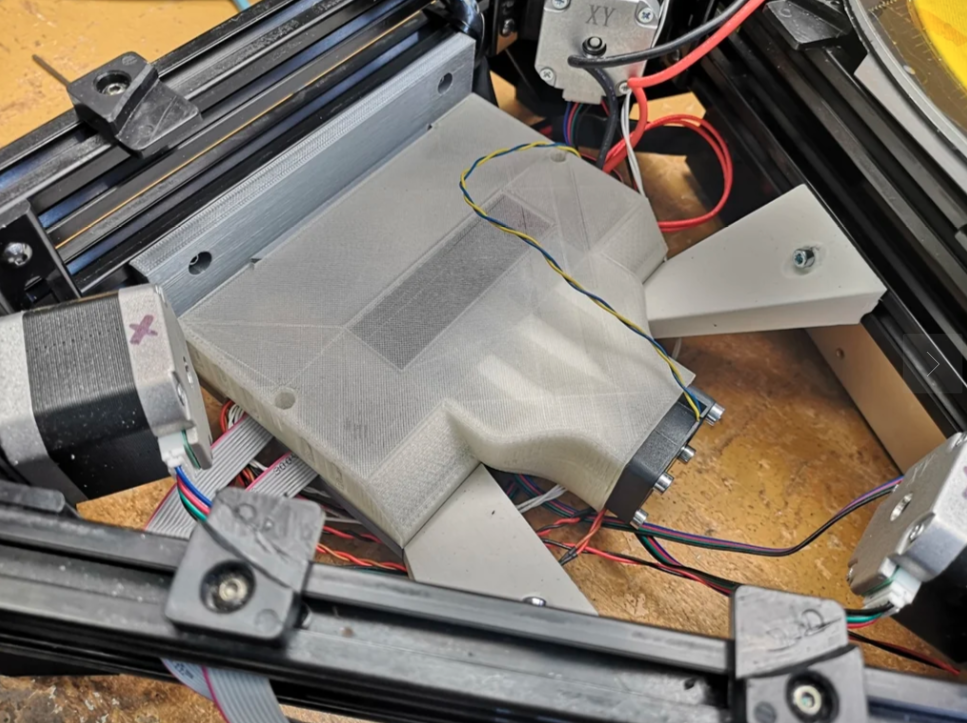
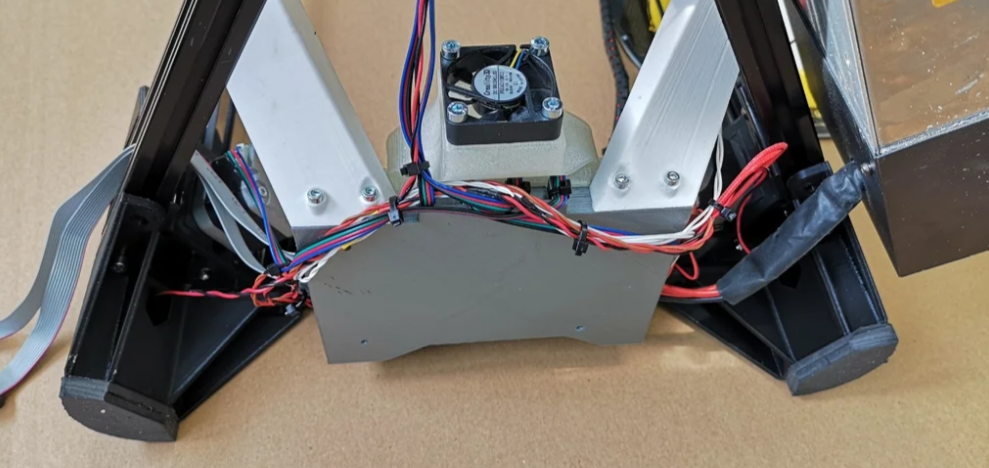
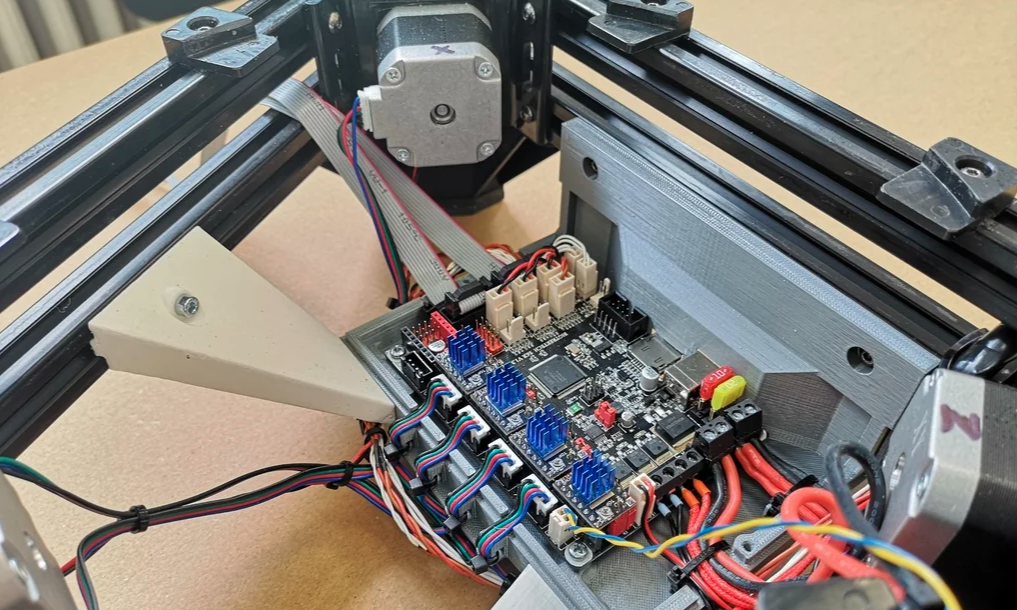
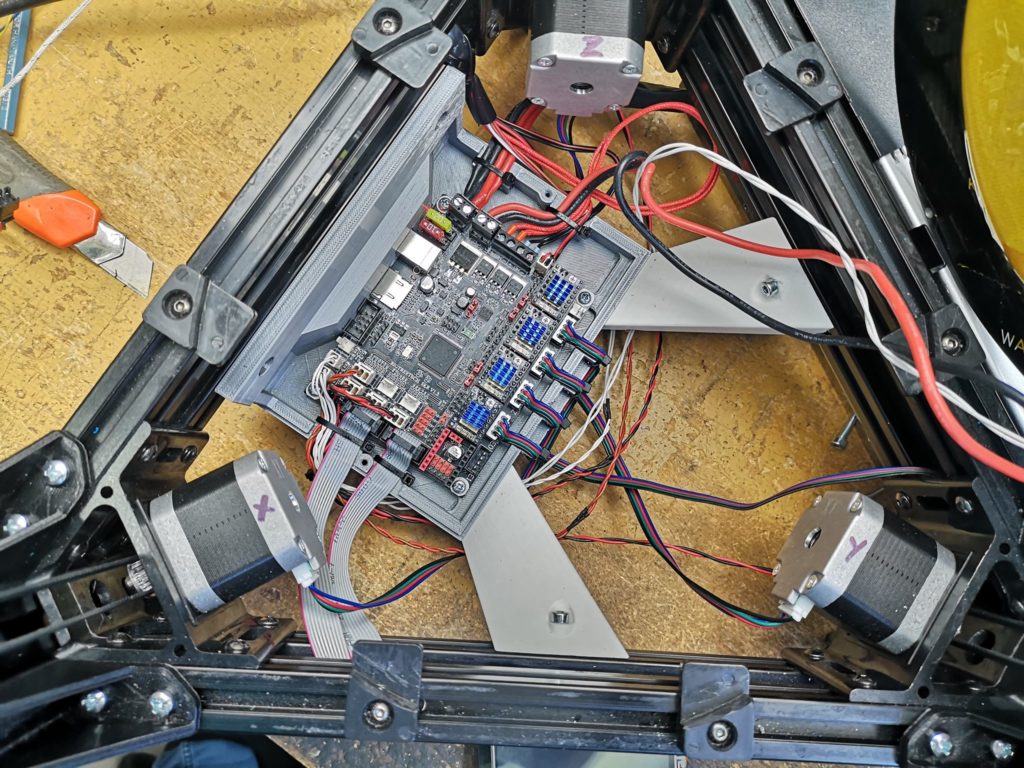
SKR 1.3 Full cover + active cooling
This is the best 3D model on Thingiverse for SKR Kossel installation. Corner parts will take up the printer a few centimeters to achieve bigger distance between electronics and heated bed. Also full SKR enclosure provides more safety against any electronics shorts and against dust. Please note that you will have to extend some of the end stop cables to be able to install this mount.

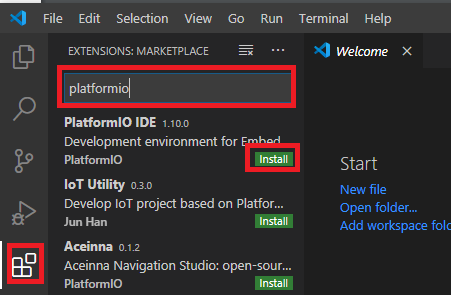
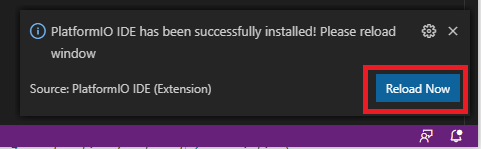
Visual Studio Code and SKR 1.3
SKR 1.3 uses ARM processor, so you cannot use Arduino IDE anymore.
Download and install this Visual Code IDE.
You will need this program to modify and create firmware file for your SKR board.


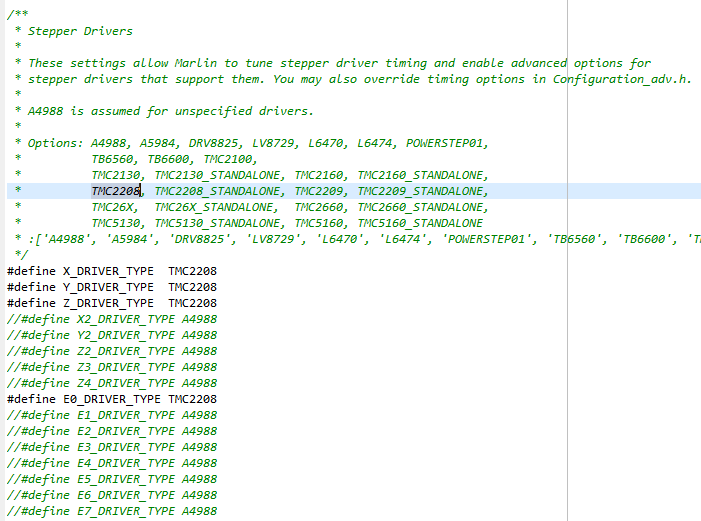
Marlin for SKR 1.3 and TMC2208 drivers
This Marlin is configured for Anycubic Kossel Linear Plus with SKR 1.3 Board and TMC 2208 drivers in UART mode, original V2 probe and original LCD.
Marlin for SKR 1.3 and TMC2209 drivers
This Marlin is configured for Anycubic Kossel Linear Plus with SKR 1.3 Board and TMC 2209 drivers in UART mode, original V2 probe and original LCD.
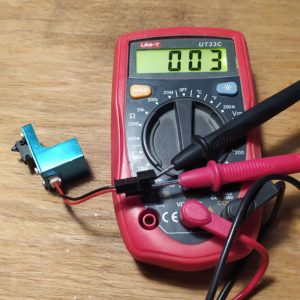
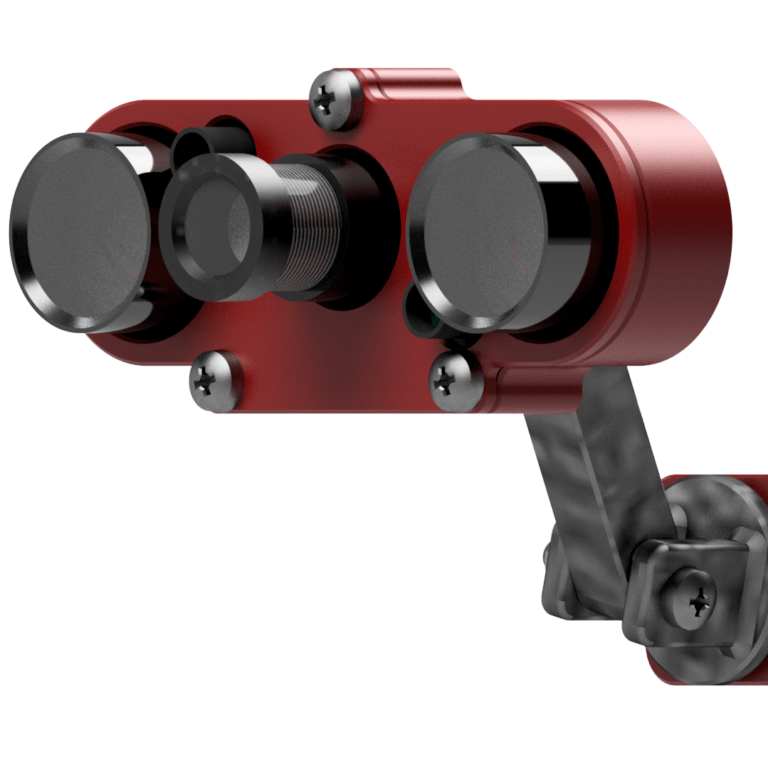
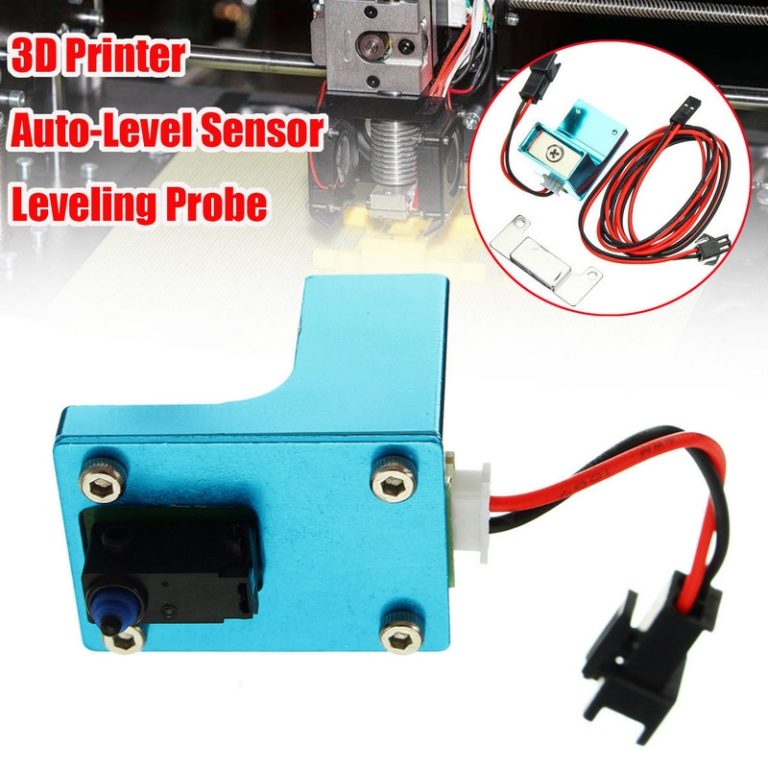
This is a standard autoleveling probe which comes with the printer since 2017. If you have received another type (microswitch is different), your probe is probabably type 1 If you have a multimeter, you can easily check that. Probe 2 is a NC - normally closed which means that it is normally switched on, so you will read a very low resistance or you can beep the contacts.


Make sure to delta calibrate
This important calibration measures each end stop’s position and arm lenght. Is also auto levels your bed.
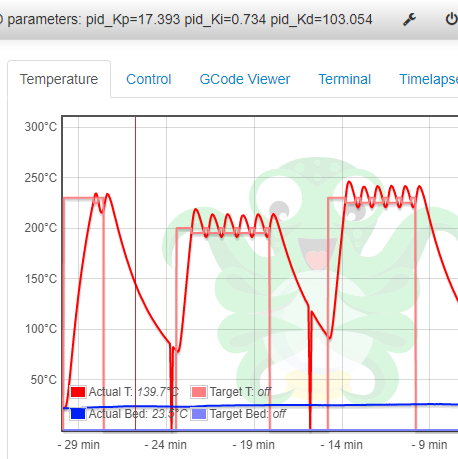
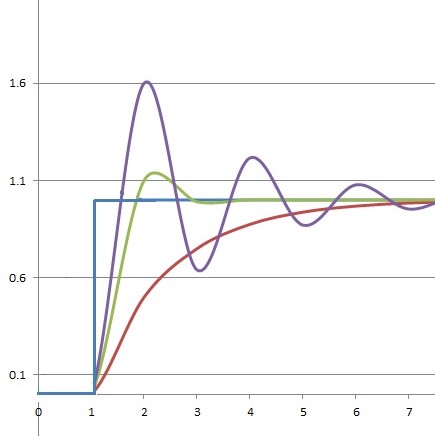
Hotend PID calibration
You also should perform PID calibration to get rid of any thermal runaway problems.

Hi, i recently upgraded in V6 Volcano hotend with your instructions and i am very satisfied. The problem is that i had the nozzle not screwed properly and plastic was leaking, i tried to do a quick fix and i somehow shorted the heater element and my kossel died. The screen will not rurn on and i cannot find it with octoprint as a machine. I guess my Trigorilla after 6 years of hard work is dead by short. I am thinking in upgrading main board, but i am unable to find the SKR 1.3 anywhere to do the upgrade with your instructions. Is there maybe a probability to do some updating for another board which is more easy to get ? Thank you.
Hi, you can use a different board such as SKR 1.4 etc…
Or buy a Trigorilla on a market place.
I would highly recommend you using a Klipper + Fluidd, it is definitely the best choice for this printer.
I have set up the SKR V1.3 to control my CNC router. I have four DM542 Stepper drivers to run my Nema 23 motors. My question is can I add a potentiometer to control the speed and thus the feed rate of my motors which can be accessed during an operation? Any suggestions?
Hello, thank you very much for this information, I am evaluating installing a SKR 1.4 turbo, but I have doubts about point 5.2. Insert UART jumpers, since the board diagram looks a bit different than SKR 1.3, what do you think I should do at this point?
Hi, unfortunatelly I have zero experience with this board.
Did you managed to make it work?
Hey Lucas,
already made the fw some time ago, but thought goin to klipper but changing back to marlin.
skr1.3 + TMC2209, but havent made backup (stupid me).
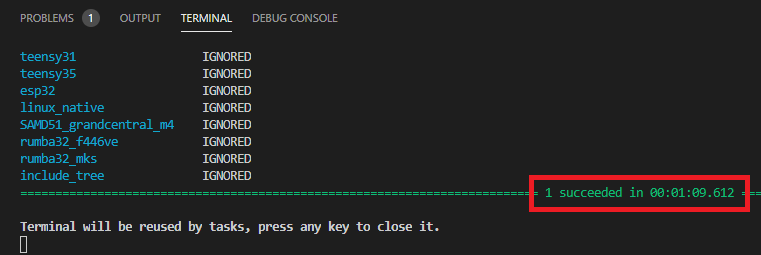
Now when compiling in vsc i get the following message:
Cannot find “c:\Marlin2.0.x-SKR1.3-2209LPomykal.cz\include”.
tried reinstalling and even different computers but all give the same msg. Can you help me with what im doing wrong?
thnx man
Hi, do you have a screenshot?
But at first… Try to download it and build it from scratch.
Why are you moving from Klipper to Marlin BTW?
had some good results with marlin wanted to try klipper but cant get it realy to work. So thought it would be easy to change back and maybe change to klipper if i have some more time getting it running, its a bit to new for me.
i posted the msg i get in the first post. Cant realy figure out how to post screenshot. Thats when I open the project (got these in the problems tab same message 2 times [ln 11, Col 17 and Ln30, Col21]
When i compile later on, the process begins and it gets terminated (failed) i get the msg:
C duration_t.h
sprintf may write a terminating nul past the end of the desitnation [-Wformat-overflow=] (Ln 130,Col35)
on another laptop he cant find the include folder.
Thnx for your help!
the biggest problem with klipper installation is the lack of knowledge for building the firmware for my setup /printer.cfg . There was a file in the guide but it seems outdated.
Hi Lucas,
still updating my Kossel LP – next thing which is not clear to me:
the orginal power supply has 12V – 25A output .. trigorilla board is powered with two cables 5A and 11A.
The new board needs only one .. i would connect the 11A output to SKR board but counting together ..
– stepper motors rated 1.5A each, 5.5 together
– the 3 fans probably uses about 1A (?)
– the motherboard (?)
– heated bed 5A (?)
all in all more than 11A
How to connect the org. PSU without risk of overlasting??
Greetz
Hi,
+ and – outputs on the PSU are connected into one if I remember correctly.
Just use one cable and you will be fine.
I highly recommend using new cables and not soldering the end of the cables.
Plus if you want to do it the best way… you can crimp connectors on the cables.
Hi Lucas,
next question on my update ..
I’ve got SKR2 Rev2 in AliEx trying to order 1.4 turbo. OK .. schould be even better than 1.4t wchich are no more aviable there.
After waching several YT reviews to this board i am not sure if the hint with cuting out the DIAG pin on TMC2209 to use mechanical end stops is still nessesary .. someone there who knows if are there jumper options on SKR2 Rev2 for that?
Greetz and hudge “Tank You” for your tutorials here.
Hi Lucas,
thanks for your woderfull explanation .. i am going to update my Delta with skr 1.4 turbo .. i will first try Marlin waiting for times raspberrys will be avaliable /cheeper again ..
My question is: do i need to buy a new display or coud i use the orginal one from Kossel?
Hi, you can definitelly use the stock one.
Hello!
I don’t understand anything about firmware)) I have Kossel Lianer plus, BTT Skr 1.3, BTT tmc2208 v3.0. I did everything according to the instructions and made the firmware (.bin) But I have a BTT_12864_mini display with SD. Do you have a firmware with such a display? Sorry for my English))
Hi mate.
Unfortunatelly, I do not.
Try to check other Marlin projects.
You should basically change the display type in Marlin, maybe a few more things to make it work.
Ok! Thank you, I will try
Hi, I have added new configuration files right here:
https://www.lpomykal.cz/anycubic-kossel-klipper-configuration/
hello I would like to add the filament sensor how can I do it
Hi, you can add it as another end stop and configure it in firmware.
Hello Lukas,
Thanks for the guide it was very easy to follow.
I have a skr1.3 board with tmc 2209 drivers and have succesfully installed marlin with your changes without any problems.
I have one problem however, everytime I try the bed leveling it stops after the first probing point and displays “Stow Z-Probe” I have tried various fixes I have found on github but none have worked for me so far. When I do a probe test it will probe once and then display “Stow Z-Probe” and afterwards “Probing failed”, the probe(Version 2) should be fine, it was working well with my trigorilla board.
Do you have any ideas?
Best regards
Pascal
Hi Lucas, I have special problems with the compiling of your SKR v1.3 Firmware for a SKF v1.4 Turbo. I changed the board to the SKR v1.4 Turbo mainboard and set the CPU of LCD1769. In case of compiling Igot many errors because of LCD1768.
May you help me or make a contact to “Friedrich Wilhelm” – he fixed the problems and got a running firmware for the SKR v1.4 Turbo board,
Thank you and best wishes from the northern Germany
agustaf
Hi, try his email:
friedrich.wilhelm@htlstp.at
I am sorry, but I cannot help you with this one…
Ahoj, skoušel jsem použít tvůj marlin pro BTT SKR 1.4 Turbo ale když jsem změnil [platformio] – default_envs na LPC1769 začalo mi to při bildu vyhazovat chybu, nevíš prosím tě kde je problém?
Ahoj, urcite to bude chtit vice uprav.
Jake ti ale nereknu. Uz dlouho pouzivam pouze Klipper a Marlinu jsem se s radosti zbavil.
Klipper? to mi nic moc neříká. Nemáš k tomu něco víc? Zaregistroval jsem akorát že je k tomu potřeba RPi ale to nemám.
Nakonec se se mi podařilo rozjet Marlin ale zase to vyhazuje: Failed to enable bed leveling a zatím jsem nenašel řešení.
Mam tu na webu kompletni navod.
a neměl by jsi prosím tě návod v češtině? s angličtinou moc dobře nevycházím a nerad bych něco zdupal.
Ahoj,
bohuzel nemam, ale obrazky by ti mely stacit.
Hi, now I found the time to upgrade my KLP with the BTT SKR 1.4turbo, TMC2209 and TFT v50. My problem is, that I can’t calibrate. When I do it onboard in the menu, when I hit “leveling”, it homes and then crashes the bed. When I hit “ABL”, it homes and then moves down 20mm and stops. No more movement and no more function (busy: paused for user), I have to turn off and on. Also with Pronterface:
SENDING:G33 P4
G33 Auto Calibrate
Checking… AC
.Height:300.00 Ex:+0.00 Ey:+0.00 Ez:+0.00 Radius:135.40
. Tx:+0.00 Ty:+0.00 Tz:+0.00
echo:busy: processing
echo:busy: processing
echo:busy: processing
echo:busy: processing
Deploy Z-Probe
echo:busy: paused for user
and then only echo:busy: paused for user
Any hints for me, please?
Hi, have you tried pressing the knob near LCD?
When I hit the knob after the printer halted from “ABL”, it moves up a little bit and after pressing “ABL” again I get an error: endstops hit: Z:429.24
Got the solution, had two problems:
->Added a fan to blow directly at the processor
->Had a faulty z-probe, changed the push button switch (https://secure.reichelt.at/at/de/mikroschalter-1x-ein-stoessel-d2hw-a201d-p243162.html?&nbc=1) and now all is running!
Thanks!
In another words… double check the probe before doing anything else.
https://www.lpomykal.cz/kossel-bed-calibration-marlin-fw/
Point 1: is acticated
Point 1: is activated
HI Friedrich Wilhelm, Iwill change the trigorilla board to a SKR v1.4 turbo with TMC2208 V2 with the firmware from Lukas for the SKR v1.3.
I changed the board in the configuration.h and compiled the stuff – no success. The compiling stopped with an error message “Oops! Make sure you have the LPC1769 environment selected in your IDE”. Do you have an idea whts going wrong or what I can do to compile the firmware?
I hope you can help.
Best wisches from northern Germany
Andreas
Hi Lukas, great site for us Anycubic Kossel Linear Plus users! Thanks
I upgraded my printer with TMC2130 standalone drivers to make it silent, that was enough for me.
Today I was looking for ways to improve it a little more and found your Klipper guides and since I already have octoprint running I will try them on Monday. Also just in case this improvement itch triggers months ago I purchased a skr1.4turbo with tmc2209 drivers
My question is: is it necessary to do the full hardware upgrade or you think klipper+stock trigorilla is enough? I’m looking for print quality more than print speed which of course I would like to improve, but only after the quality of the prints improve from what they are now running marlin 2.0
Thanks a ton and greetings from Buenos Aires, Argentina
Hi,
I still use Trigorilla. It has more PWM fan outputs + it is UART capable.
There is no reason to upgrade the stock board for SKR if you use Klipper.
Lukas,
I finally got to the point where I can compile and I run into a snag. At 11.3 you say to check the board which is correct then at 11.4 I press control, shift and B. I do that and I have zero bugs but it asks me to select the build task to run and says no build task to run found. I am having problems getting past this point. Can you point me in the right direction please.
hello does anyone know where the z probe must be plugin on my skr 1.4 turbo???
Thanks, Lucas, for the clear and concise tutorial. I followed your instructions installing the BTT SKR 1.3 w/ TMC2209 drivers on my AKLP. While executing the G33 and after the ‘Stow Z-Probe’, the printhead moves up about 40mm close to the YZ side and gives me an “M112 Shutdown: PRINTER HALTED Please Reset”. Do you have any suggestions as to why this is happening and how I could fix it?
Hi, double check your wiring – motors, end stops, probe.
Dear Lukas,
What an absolute lovely tutorial, so I also wanted to give it a try. I already have a set of TMC2208, so (I thought) am good to go with only the SKR1.3 board. While installing and testing, I’m running in some problems.
Setting up for UART doesn’t work, probably because I have a Fysetc TMC2208 v1.2. In their datasheet (https://wiki.fysetc.com/TMC2208/) mentions the V1.0 needs config, and v1.2 is UART mode, but further research brings it’s only UART compatible with the Fysetc F6 board… bummer! The “UART This! Instructable” and “Teachin Tech TMC2208 guide” tell to do some soldering on the 2208’s, use jumpercables with 1K resistors, plug it into AUX2 pins and tell the firmware what those pins need to do, but so far, I have not found AUX2 or any adjustable pins. Bummer, but running it in legacy mode surely must give a print, right?! Wrong! XYZ motors go excellent, but the extruder cuts out like Fabrizio mentions, but cutting out stealthchop is missing the whole point of using silent stepperdrivers. I removed the boxcooling, even than the chips stay at 40C, not that hot?! I set Vref at 0,9V.
It seems the TMC2208 v1.2 are not compatible straight away and I’m running out of idea’s to fix it.
Do you have an advice to fix it with my current chips to full UART, or do you recon to order the TMC2209’s? This would fix it for €18,- or so, but that isn’t the sport, is it?
Thanks in advance!
Hi, thank you.
I have never tried Fysetc 2008 UART mode.
I would definitely go for 2209, it is a great upgrade.
Ciao Lukas
Ho configurato la mia Kossel linear plus con SKR 1.3 con tmc2209 _standelone, tutto ok … ma estrusore E1 non si muove (secondo estrusore) . Nel file pins_BTT_SKR_V1_3.h l’estrusore E1 non ha il numero dei pins da abilitare, puoi darmi un aiuto?
Hai una configurazione con SKR 1.4 oppure SKR_PRO_v1_1?
Grazie
Antonio
Hi Lukas,
First of all many thanks for this precious guide.
Followed it step by step double checking everything.
Axis movement works great but i have extruder problems.
It randomly and suddenly stops extrudin, it’s not a matter of temperatures or clog.
The stepper itself stops spinning.
It happens randomly sometimes at the second layer, last print at 93% and it was printing like a charm.
I’m on Anycubic Linear Plus. skr 1.3 with watterott tmc2208 (had it already installed on my trigorilla) in UART (soldered the pads) on all motors.
Checked vref on all potentiometers, raised extruder to 1.1 same isssue.
Googling around seen many people had this issue but you seem not.
Any idea of what should i try?
Thanks in advance
Hi,
So do you use UART or not?
What do you use for fan active cooling?
Why do you think it is not a temperature issue?
Yes i’m using Uart, all 4 motors set in stealthchop.
Active cooled using a 5015 turbofan with tunnel over the drivers heat sink.
The motor itself isn’t even, warm same for the drivers, overheating would eventually start with losing step, but the E motor simply stop rotating from perfect to 0 like if it was disabled.
It happens in random positions, sometimes in second layer, last print at 89%
Hello Lukas, managed to solve and now getting almost perfect prints.
Will share the solution for others with same issue.
It seems that older 2208 like mine have some strange difficulty to manage stealtchop and linear advance. Solved disabling stealthchop on extruder directly from printer.
Hello,
is there some way, hot to instal runout senzor please?
Thank you very much.
Hi,
https://marlinfw.org/docs/gcode/M412.html
You can use free pins for end stops.
Lukas, I went through your tutorial, for installing a SKR 1.3 board with 2209 drivers, line by line and changed what was suggested. I have a anycubic kossel pulley. When i go into VScode and try to install platformIO IDE it gives me this error message: Error: Could not start PIO Home server: Error: timeout
at c:\Users\GearysPC\.vscode\extensions\platformio.platformio-ide-2.2.1\node_modules\platformio-node-helpers\dist\index.js:1:5703…
It will not put Pio into VScode.
Do you possibly have a work around so I can install the FW onto the SD card?
or do you know what I can do to fix this?
Thanks
Buongiorno Lukas e grazie per quello che fai per noi affezionati Delta Kossel!!
Ho 2 stampanti Delta Kossel linear plus da 2 anni, pochissimi problemi, sono delle bellissime macchine per il loro prezzo!!
Sono un appassionato della stampa multicolore con 3 estrusori quindi ho sostituito la Trigorilla originale con una scheda Rumba plus 8bit
che ha 3 estrusori. Mi sono accorto che le schede Rumba plus non sono uguali, cioè una è della Makerbase ed ha un’uscita aux_1 e l’altra è della Aus3d e non ha questa uscita che ho utilizzato per un display Bigtreetech tft35 v3 dual mod. è magnifico!!
La scheda Rumba plus Makerbase non è facilmente reperibile sia da Aliexpress Amazon Bangood tempi di consegna molto lunghi e non vanno al termine perchè hanno tutti i magazzini bloccati!
Volevo passare alla scheda SKR PRO V1.1 a 32 bit e che gestisce 3 estrusori e ha uscita dedicata per TFT35 V3 ma purtroppo non riesco a configurare il firmware con VScode impostando i parametri come hai fatto tu cambiando su :
configuration.h = MOTHERBOARD BOARD_BTT_SKR_PRO_V1_1
platformio.ini = BIGTREE_SKR_PRO
Quello che Ti chiedo è questo, Tu puoi fare un tutorial su come settare fw con VScode su SKR PRO V1 …. oppure RUMBA32 ?
Grazie
Antonio
Hello,
Thank you for your amazing guide and a lot of time you are putting into this. I just wanted to ask, if it is possible to turn on the box cooling fan automatically whenever any stepper is enabled and turn off after a set period after all steppers are turned off. I tried to configure the marlin setting just like this:
#define USE_CONTROLLER_FAN
#if ENABLED(USE_CONTROLLER_FAN)
//#define CONTROLLER_FAN_PIN P1_28 // Set a custom pin for the controller fan
I wired every cable according to this guide.
It seems that is not working and my electronic box cooling fan is still on (whenever I turn my printer). What am I missing?
Hi, I am not so sure about this.
In Klipper you can “connect” this pin to extruder so it starts cooling down after the extruder has started heating up…
I have not use Marlin for ages, because it is a nightmare for technicians compared to Klipper 😀
So you can still use Klipper with this board? I love Klipper since following your guide, and my printer has never been so easy to use.
Sure thing.
Klipper supports a lot of different boards.
I still use the original Trigorilla, because it simply provides more fan PWM options.
Hi, this guide looks good, thank you.
Please. do you know, is it also working with SKR 1.4 and TMC2209? Or are the changes to much?
kind regards
Friedrich
Hi, you just need to change the motherboard type + drivers in FW and a few more lines.
Thank you, I have copied the board 1_4_TURBO from boards.h to config.h (line 149, #ifndef motherboard), typed in the TMC2209 like you shown in point 9.5 and verified the other settings from your tutorial. Is this all I have to do?
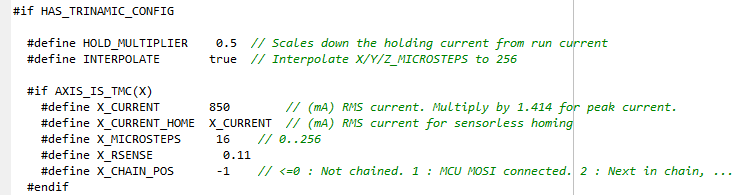
In point 10 you write about the amps for the stepper drivers. It is under #if HAS_TRINAMIC….., but it will be a SKR now, does this matter in any way?
kind regards to cz from at
Friedrich
Hi, Trinamic = TMC drivers.
Stock settings should be about 0.9A so it should work without any problems.
But my recommended currents are 0.7-0.75A for XYZ and 1A for E.
Sorry, I confound with Trigorilla…
Are the changes correct and is it all I have to do? Have you meant this with “a few more lines”?
kind regards
Friedrich
Basically…
Use the files for SKR 1.3, change the board type and driver definiton for those TMC2209.
It is possible that there will be some other problem, I do not own this board.
Got the right hint on Github: “Hi delete everything inside the folder (WINDOIWS) C:\Users.platformio and try again.”
After this I had the same issue like Paul Hughes, solved this with your hint: https://github.com/MarlinFirmware/Marlin/issues/16529, now it works and everything is fine, thank you very much, have a good time and stay safe.
Hi, thank you!
Hello,
When I go to compile I get the below error, I followed your instructions but I am unsure why I have this error. is there a chance you know how to solve? I have probe v2 and am using your skr 1.3 with 2208s (although i changed it to 1.4)
#error “Z_MIN_PROBE_USES_Z_MIN_ENDSTOP_PIN requires the Z_MIN_PIN to be defined.”
Hi,
I hope it helps.
https://github.com/MarlinFirmware/Marlin/issues/16529
https://github.com/MarlinFirmware/Marlin/issues/6983
https://www.reddit.com/r/BIGTREETECH/comments/fsexxy/firmware_question_z_min_probe_uses_z_min_endstop/
Hi, I try to follow your guide and I’m wondering how you connected the Anycubic PSU to the skr board? On the pictures it looks like you put two leads in the + and – connectors on the 12V power in. Can you help me on this?
Hi, it is easy.
Original PSU has 2x + and 2x – terminals.
The trick is to connect them – make two + into one and the same for -.
So just use a cable, connect those ++ and use one wire between the psu and motherboard…
The same for -.
i found your tutorial very interesting… i have in my hands a skr 1.3 with drv8825 stepper what i need to change to work with this stepper? the delta i building is almost the same size as anycubic but without probe…
i will try to use mesh bed leveling…
Hi, you would need to change the stepper definiton in Marlin.
But by advice is to get rid of those drivers.
They are one of the worst drivers you can buy, even original A4988 are better, than those drv8825…
wow thanks for reply… and i thinking is better than the a4988 hehehehe
i will buy the exact model of your tutorial 🙂
thanks for reply
Hi, thank you!
TMC2209 is the best option if you consider the price value for those bucks…
TMC2209 is the best choice right now.
They are a few bucks more expensive (for a kit), but the inner resistance is about 1/2, so they create much less heat.
A4988 have better microstepping capabilities, even stock FW uses microstepping and the problem with a DRV8825 is that the microstepping does not work well.
Hi, I have a kossel but I invert the electronics to de upper side. My problem is that I had the conversion to skr 1.3 with drivers 2130 spi on XYZ and tmc 2208 uart E0.
It’s impossible that kossel works now because when I activate homming, the drivers don’t stop and the printer does a noise sound like a drill. When I do the autocalibrate the printer doesn’t work.
Now I need help. Please.
Hi, your problem could be with bad end stop wiring, marlin definiton or with enabled sensorless homing.
Thankyou very much.
I will try and check this.
Thankyou
Lukas,
Thank you so much for the guides that you publish! I just installed the SKR1.3 & TMC2209’s into an AKL. Yes, the enclosure will fit into a non-plus version, but it’s tight!. I plan to remodel the enclosure at some point, but first, I have things to print on this silent beast!
Thank you again!
Best,
J Petrie
Hi, thank you for your feedback :)))
Hi Lukas,
Thanks for the really detailed guide, it’s been an excellent resource!
I wonder if you may be able to help with slight issue I am having with the SKR marlin firmware. Each time that I turn the printer on, bed levelling is defaulting to off. I’ve checked online and some suggestions were to check restore levelling after G28 was defined, but it seems that it is. Am I missing something obvious, or is there another setting I need to enable for it to turn levelling on from power on?
Thanks in advance,
Hi,
how did you find out it is turned off?
You could try adding one line in your start code, it should be mentioned in my standard firmware guide (for stock board).
Hi,
Thanks for your reply!
I noticed it when chasing the z-offset. I had everything dialled in nicely and settings stored, but when I came to turn the machine back on the next day, it seemed like everything was gone. I thought it was a bed-level glitch so went to re-level, and found that bed levelling was off completely – once re-enabled it was printing happily again. When I power on the machine, I have to auto-home and then manually turn bed levelling on before the first print, and it will then stay on after each print. It only seems to turn itself off when there is a power cycle.
I’ll check out your firmware guide and see if I can find that start code that you mentioned.
Thanks again,
Enable it in the start g-code.
With what command do you turn it on manually?
Hi Lukas,
Great manual and I’m currently going step by step on installation with TMC2209 UART drivers. Being newb with electronics in general I have 2 particular questions:
1) 5 red jumpers on section XST, YST etc. (left of EXP2) – Do they need to be removed as well? I assume yes, because I see on actual pictures of installations they are removed.
2) SD card- Once the firmware is installed, are we OK to remove the SD micro card from the board or it needs to stay there. Can I still use normal SD card attached on the stock LCD screen to print from it?
Hi, remove them too.
Keep the micro SD card there.
There is no reason to remove it.
And yes, you can still use SD card on your LCD module.
everything works perfect and its very easy to follow step by step , great work .
Thanks 🙂
Hello Lukas!
I am currently following your guide with the SKR 1.3 & TMC 2209s using your config, and when I install it I get error “TMC Connection error”.
Any idea how this can be fixed?
I also tried basic movements now with that error on: when i try to move printer up/down in Z , it goes to opposite direction. X/Y work fine.
Hi!
That error means that there is some problem in the wiring (jumpers) or you have something wrong with the drivers in FW.
Hey, Did you ever come up with a solution to this?
Was it jumper centric or drivers?
Hi Lukas, do you think that Sensorless would work with Anycubic Kossel? Would you give a chance to have it working on your configuration?
I know that Sensorless Homing is not suggested and guaranteed on delta printers due to the fact that th probe wouldn’t be repeatable with a reliability of 100%.
I was thinking about it becasue the small blocks on linear guides end could be a good and firm “obstacle” to trigger the software endstop.
Let me know you point of view.
Thanks
Giancarlo
Hi, I know that some people have used it and are using it without problems, but a much more of them had issues with this feature.
I personally see no benefit. The end stops are precise enough.
Delta calibration and z offset settings are much more important.