This article will guide you through Anycubic Kossel Klipper configuration.
Follow the steps and create your own configuration.
Klipper uses printer.cfg configuration file which is something similar to Marlin configuration and configuration_adv files.
This file can be easily modified with text editors, such as Pspad, or NotePad and uploaded to Raspberry via SFTP in Total Commander.
This article is about stock setup – stock A4988 drivers and Trigorilla board, but you can also download configuration file prepared for UART TMC drivers or for a SKR board.
Download configuration file for your printer.
I do not have every driver type or board, but I consider Trigorilla, SKR, A4988, TMC2208/TMC2209 as a standard these days.
You can learn more about configuration files HERE on Klipper GIT
If you have TMC2209, download some of the TMC2208 configuration files and just simply rename all TMC2208 definitions to TMC2209.
NEW CONFIGURATION FILES WITH ROTATION DISTANCE
Stock board (Trigorilla) and stock (A4988) drivers
Stock board (Trigorilla) and TMC2208 UART drivers
Stock board (Trigorilla) and TMC2206 UART drivers
OLD CONFIGURATION FILES (DO NOT WORK ANYMORE)
I have kept these files so you can use configuration from them or use them on older Klipper instances.
Stock board (Trigorilla) and stock (A4988) drivers
Stock board (Trigorilla) and TMC2208 DIY drivers
Stock board (Trigorilla) and TMC2208 UART drivers
SKR 1.3 and TMC2208 UART drivers
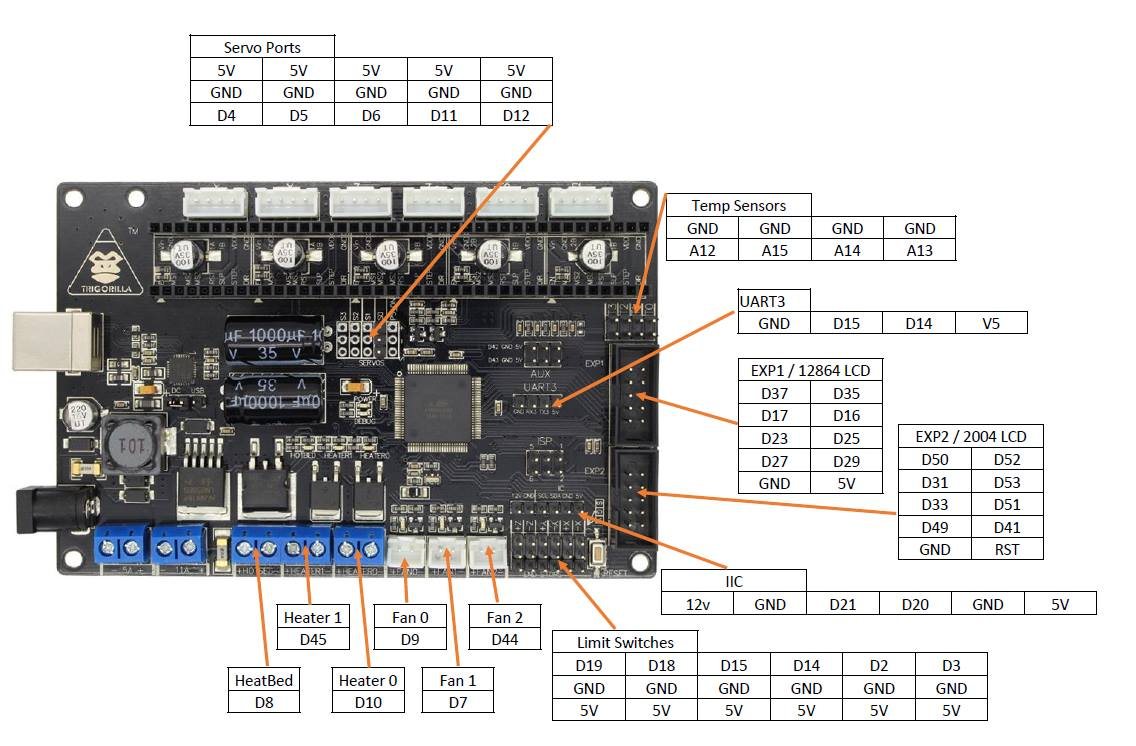
Here is a simplified pin schematic for a standard Trigorilla board.
If you want to use UART, follow this guide CLICK HERE
These steps are optional.
If you have the same configuration as one of my configuration files, you can skip these steps.
If you want to learn more about Klipper configuration files, open the printer.cfg file with a text editor such as NotePad+, PSPad.
I have tried to make this as simple as possible.
On the left side you will see a configuration from printer.cfg file and description on the right side.
This part is configured for original autoleveling Z probe type 2.
Older Kossels can be equipped with type 1 probe which is NO – normally open type which means that you have to invert logic:
pin: !ar18
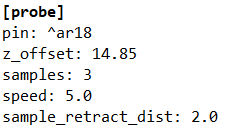
pin– probe is connected to pin 18, which is a standard Z probe pin
z offset – Z height of your probe (when it triggers)
samples – how many times will be each leveling point measured
speed – probing speed
sample_retract_dist – Z probe retraction distance between samples
If you are not sure about your probe type, check it with a multimeter:
Probe 2 is a NC – normally closed which means that it is normally switched on, so you will read a very low resistance or you can beep the contacts – if it beeps without touching the probe, it is type 2.

Klipper defines pins and all other stepper settings in each stepper driver block.
The code you can see below is a stepper definition for standard A4988 drivers and Trigorilla board.
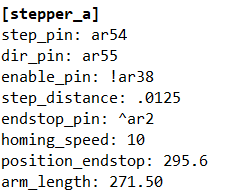
step_pin – step pin
dir_pin – direction pin
enable_pin – enable pin
step distance – mm/s per one step
step distance was changed to rotation distance
endstop_pin – end stop pin for each axis
This is a standard configuration for a stock extruder.

step_distance – mm / step, magic number
heater_pin – board pin for heating element
sensor_type – thermistor type
sensor_pin – thermistor pin
control – type of control
pid values – hot end PID values
min_extrude_temp – extruder can move only above this temperature
min_temp – minimal hot end temperature
max_temp – maximal hot end temperature

heater_pin – bed heater pin
sensor_type – thermistor type
sensor_pin – thermistor pin
control – type of control
min_temp – minimal bed temperature
max_temp – maximal bed temperature
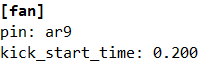
pin – Trigorilla fan pin (in this case fan 0 = D9 = ar9)
kick_star_time – start fan after 0.2 s of printing
If you want your extruder fan to be quieter, you have two options:
Follow this fan upgrade guide CLICK HERE
Or set the speed to a lower value and perform a PID calibration.
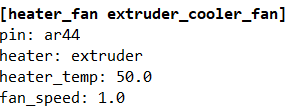
pin – Trigorilla fan pin
heater – what heater does the fan cool down
heater_temp – fan starts working at this heater temperature
fan_ speed – 1.0 means 100% of the maximal fan speed
You can use more output pins, you only need to define them.
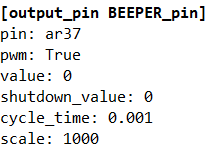
You can define another output pins.
In this case:
[output_pin BEEPER_pin] – beeper pin
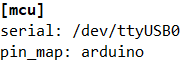
Trigorilla is basically a modified Arduino Mega
As you can see below, our printer has a delta kinematics with a 120 mm radius (240 mm bed) and the maximal values for velocity, acceleration and z velocity are defined here.

kinematics – printer type
max_velocity – maximal velocity failsafe
max_accel – maximal acceleration failsafe
max_z_velocity – maximal Z axis velocity failsafe
delta_radius – bed radius
minimum_z_position – maximal deviation from the printer height
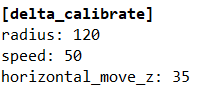
radius – bed calibration radius
speed – calibration speed
horizontal move_z – z move between probing points
speed – travel speed between probing points
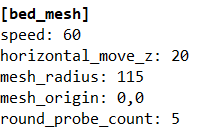
horizontal_move_z – z move between calibration points
mesh_radius – calibration radius
mesh_origin – where the center of the bed is
round_probe_count – how many points will be measured
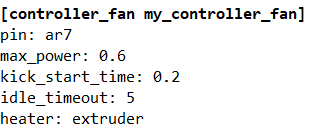
pin – fan pin, in this case ar7 = D7 = FAN1 connector
max_power – PWM value 0-1.0
kick_start_time – start after xx seconds
idle_timeout – end after xx seconds
heater – in this example extruder – it starts heating up, fan starts working


what is the pin for the probe? it says ^ar18 but klipper says that pin ar18 doesnt exist
The link to the config file is not working.
http://www.lpomykal.cz/download/kossel/Klipper/Klipper-Anycubic-Kossel-TMC2208.zip
please send me latest config file for TMC2209
Thanks,
Lukas, I’ve searched around a lot and I’ve not found any information on this but when using a adxl to calibrate resonance on the kossel, in the adxl config file, what would the probe points be? i know what they are on my bed slinger but I’m not sure what or how to get those on a delta
Hello lukas, i´m trying to download config files but it doesn´t. i do know if it is a problem of my computer or it is no more available.
Hi Gino,
I have verified the links and they are working.
It is possible that the issues are caused by your browser/some protection application.
I’m getting an error when trying to connect. My printer screen just stays with solid blocks on the screen:
Option ‘mesh_min’ in section ‘bed_mesh’ must be specified
This is strange since this is a round bed and the mesh_min is only for Rectangular beds. Here is my config:
# This file contains a configuration for the “Anycubic Kossel Linear
# Plus Large Printing Size”, “Anycubic Kossel Pulley Plus Large
# Printing Size” and similar delta printer from 2017.
# The Anycubic delta printers use the TriGorilla board which is an
# AVR ATmega2560 Arduino + RAMPS compatible board.
# To use this config, the firmware should be compiled for the AVR atmega2560.
# See docs/Config_Reference.md for a description of parameters.
[stepper_a]
step_pin: PF0
dir_pin: !PF1
enable_pin: !PD7
microsteps: 16
rotation_distance: 40
endstop_pin: ^PE4
homing_speed: 60
# The next parameter needs to be adjusted for
# your printer. You may want to start with 280
# and meassure the distance from nozzle to bed.
# This value then needs to be added.
position_endstop: 295.6
arm_length: 268.0
[stepper_b]
step_pin: PF6
dir_pin: !PF7
enable_pin: !PF2
microsteps: 16
rotation_distance: 40
endstop_pin: ^PJ0
[stepper_c]
step_pin: PL3
dir_pin: !PL1
enable_pin: !PK0
microsteps: 16
rotation_distance: 40
endstop_pin: ^PD2
[extruder]
step_pin: PA4
dir_pin: !PA6
enable_pin: !PA2
microsteps: 16
rotation_distance: 33.333
nozzle_diameter: 0.400
filament_diameter: 1.750
heater_pin: PB4
sensor_type: EPCOS 100K B57560G104F
sensor_pin: PK5
control: pid
pid_Kp: 25.349
pid_Ki: 1.216
pid_Kd: 132.130
min_extrude_temp: 150
min_temp: 0
max_temp: 275
[heater_bed]
heater_pin: PH5
sensor_type: EPCOS 100K B57560G104F
sensor_pin: PK6
control: pid
pid_kp: 73.517
pid_ki: 1.132
pid_kd: 1193.728
min_temp: 0
max_temp: 130
[fan]
pin: PH6
kick_start_time: 0.200
[heater_fan extruder_cooler_fan]
pin: PL5
# if you want to use your probe for DELTA_CALIBRATE you will need that
#[probe]
#pin: ^PD3
#z_offset: 15.9
#samples: 3
[mcu]
serial: /dev/serial/by-id/usb-Silicon_Labs_CP2102_USB_to_UART_Bridge_Controller_0001-if00-port0
[printer]
kinematics: delta
max_velocity: 500
max_accel: 3000
max_z_velocity: 200
delta_radius: 115
# if you want to DELTA_CALIBRATE you may need that
#minimum_z_position: -5
[idle_timeout]
timeout: 360
[delta_calibrate]
radius: 115
# If the original probe is used
#horizontal_move_z: 20
# “RepRapDiscount 2004 Smart Controller” type displays
[display]
lcd_type: hd44780
rs_pin: PH1
e_pin: PH0
d4_pin: PA1
d5_pin: PA3
d6_pin: PA5
d7_pin: PA7
encoder_pins: ^PC6, ^PC4
click_pin: ^!PC2
kill_pin: ^!PG0
[bed_mesh]
speed: 50
# The speed (in mm/s) of non-probing moves during the
# calibration. The default is 50.
horizontal_move_z: 5
# The height (in mm) that the head should be commanded to move to
# just prior to starting a probe operation. The default is 5.
samples: 1
# The number of times to probe each point. The probed z-values
# will be averaged. The default is to probe 1 time.
samples_result: average
# One can choose median or average between probes samples
# The default is average.
sample_retract_dist: 2.0
# The distance (in mm) to retract between each sample if
# sampling more than once. Default is 2mm.
bed_radius: 115
# Defines the radius to probe for round beds. Note that the radius
# is relative to the nozzle’s origin, if using a probe be sure to
# account for its offset. This parameter must be provided for round
# beds and omitted for rectangular beds.
round_probe_count: 7
# For round beds, this is integer value defines the maximum number of
# points to probe along each axis. This value must be an odd number.
# Default is 5.
#fade_start: 1.0
# The gcode z position in which to start phasing out z-adjustment
# when fade is enabled. Default is 1.0.
#fade_end: 0.0
# The gcode z position in which phasing out completes. When set
# to a value below fade_start, fade is disabled. It should be
# noted that fade may add unwanted scaling along the z-axis of a
# print. If a user wishes to enable fade, a value of 10.0 is
# recommended. Default is 0.0, which disables fade.
#fade_target:
# The z position in which fade should converge. When this value is set
# to a non-zero value it must be within the range of z-values in the mesh.
# Users that wish to converge to the z homing position should set this to 0.
# Default is the average z value of the mesh.
split_delta_z: .025
# The amount of Z difference (in mm) along a move that will
# trigger a split. Default is .025.
move_check_distance: 5.0
# The distance (in mm) along a move to check for split_delta_z.
# This is also the minimum length that a move can be split. Default
# is 5.0.
mesh_pps: 2,2
# A comma separated pair of integers (X,Y) defining the number of
# points per segment to interpolate in the mesh along each axis. A
# “segment” can be defined as the space between each probed
# point. The user may enter a single value which will be applied
# to both axes. Default is 2,2.
algorithm: lagrange
# The interpolation algorithm to use. May be either “lagrange”
# or “bicubic”. This option will not affect 3×3 grids, which
# are forced to use lagrange sampling. Default is lagrange.
#bicubic_tension: .2
# When using the bicubic algorithm the tension parameter above
# may be applied to change the amount of slope interpolated.
# Larger numbers will increase the amount of slope, which
# results in more curvature in the mesh. Default is .2.
#relative_reference_index: 0,0
# A point index in the mesh to reference all z values to. Enabling
# this parameter produces a mesh relative to the probed z position
# at the provided index.
#*#
#*# DO NOT EDIT THIS BLOCK OR BELOW. The contents are auto-generated.
#*#
#*# [extruder]
#*# control = pid
#*# pid_kp = 35.063
#*# pid_ki = 1.601
#*# pid_kd = 191.968
#*#
#*# [heater_bed]
#*# control = pid
#*# pid_kp = 75.103
#*# pid_ki = 1.192
#*# pid_kd = 1182.869
#*#
#*# [printer]
#*# delta_radius = 133.509620
#*#
#*# [stepper_a]
#*# angle = 209.893876
#*# arm_length = 268.000000
#*# position_endstop = 299.344245
#*#
#*# [stepper_b]
#*# angle = 329.707591
#*# arm_length = 268.000000
#*# position_endstop = 299.388477
#*#
#*# [stepper_c]
#*# angle = 90.000000
#*# arm_length = 268.000000
#*# position_endstop = 298.870922
#*#
#*# [delta_calibrate]
#*# height0 = 0.0
#*# height0_pos = 23936.000,23936.000,23936.000
#*# height1 = 0.0
#*# height1_pos = 27977.000,27977.000,21315.000
#*# height2 = 0.0
#*# height2_pos = 23244.000,30391.000,23244.000
#*# height3 = 0.0
#*# height3_pos = 21482.000,27323.000,27323.000
#*# height4 = 0.0
#*# height4_pos = 23194.000,23194.000,28349.000
#*# height5 = 0.0
#*# height5_pos = 26727.000,21658.000,26727.000
#*# height6 = 0.0
#*# height6_pos = 29300.000,23205.000,23205.000
#*#
#*# [bed_mesh default]
#*# points =
#*# -0.049992, -0.049992, -0.049992, -0.049992, -0.049992, -0.049992, -0.049992
#*# -0.195412, -0.195412, -0.201065, -0.200713, -0.204221, -0.348542, -0.348542
#*# -0.195868, -0.195868, -0.200640, -0.202996, -0.203770, -0.296270, -0.296270
#*# -0.197959, -0.200181, -0.198642, -0.252948, -0.196113, -0.294330, -0.396932
#*# -0.252396, -0.252396, -0.243602, -0.202857, -0.197677, -0.200380, -0.200380
#*# -0.247202, -0.247202, -0.246102, -0.201846, -0.194793, -0.245033, -0.245033
#*# -0.298514, -0.298514, -0.298514, -0.298514, -0.298514, -0.298514, -0.298514
#*# x_count = 7
#*# y_count = 7
#*# min_x = -114.99
#*# max_x = 114.99
#*# min_y = -114.99
#*# max_y = 114.99
#*# x_offset = 0.0
#*# y_offset = 0.0
#*# mesh_x_pps = 2
#*# mesh_y_pps = 2
#*# algo = lagrange
#*# tension = 0.2
#*#
#*# [bed_mesh craig]
#*# points =
#*# -0.049992, -0.049992, -0.049992, -0.049992, -0.049992, -0.049992, -0.049992
#*# -0.195412, -0.195412, -0.201065, -0.200713, -0.204221, -0.348542, -0.348542
#*# -0.195868, -0.195868, -0.200640, -0.202996, -0.203770, -0.296270, -0.296270
#*# -0.197959, -0.200181, -0.198642, -0.252948, -0.196113, -0.294330, -0.396932
#*# -0.252396, -0.252396, -0.243602, -0.202857, -0.197677, -0.200380, -0.200380
#*# -0.247202, -0.247202, -0.246102, -0.201846, -0.194793, -0.245033, -0.245033
#*# -0.298514, -0.298514, -0.298514, -0.298514, -0.298514, -0.298514, -0.298514
#*# x_count = 7
#*# y_count = 7
#*# min_x = -114.99
#*# max_x = 114.99
#*# min_y = -114.99
#*# max_y = 114.99
#*# x_offset = 0.0
#*# y_offset = 0.0
#*# mesh_x_pps = 2
#*# mesh_y_pps = 2
#*# algo = lagrange
#*# tension = 0.2
Any help appreciated. I just upgraded and found out that a new config overhaul is required to work with the new Klipper and Octoprint version.
I had my kossell working with the older Klipper and Octopi, but I’ve upgraded to Octopi 0.18.0. and nothing is working now. I’ve seen people talking about a new config. Are there fundamental changes that I will have to incorporate into my existing Klipper backup config in order for this to work now? I am all standard on my Anycubic Kossell Linear Plus machine.
hello lukàs
I took out my kossel since, shortly I did the klipper update I have version v0.9.1 -502-g33bc82D should I modify my .cfg file and use the new one that you put on your site? (tmc2208UART on my board) you say that the old one is obsolete but it works do I have any interest in replacing my .cfg
thank you for your support from the roof this time
Hello, some issues, I bought a RPI to be trendy and I had installed Octoprint+Klipper with Git configuration and autoleveling taken from your description. unfortunately it doesn’t work.
with GIT configuration and autoleveling taken from your description. Unfortunately it doesn’t work.
2022-01-15 16:56:06,607 – octoprint.util.comm – INFO – Changing monitoring state from “Starting” to “Printing”
2022-01-15 16:57:19,262 – octoprint.plugins.klipper – ERROR – Move out of range: -54.672 95.203 -0.025 [0.000]
2022-01-15 16:57:19,266 – octoprint.util.comm – WARNING – Received an error from the printer’s firmware: Move out of range: -54.672 95.203 -0.025 [0.000]
| Last lines in terminal:
| Recv: B:100.3 /100.0 T0:253.0 /250.0
Hi, post your printer.cfg file.
Can you move to X Y?
Is the issue the Z value?
Double check this value, it is possible that you need to adjust it.
minimum_z_position: -5
It basically tells this:
How many mm can the printhead move down from end stops:
Maximal Z movement = position_endstop – minimum_z_position
For example with these values:
position_endstop: 300
minimum_z_position: -5
You would get:
Maximal Z movement = 305 mm (which means that the nozzle can move 305 mm in Z direction from end stops).
1st solved with recalibration,
2nd problem:
Error reported by printer
Your printer’s firmware reported an error.
Due to that the ongoing print job will be cancelled.
Reported error: Move exceeds maximum extrusion (0.751mm^2 vs 0.640mm^2)
Well… It would be nice to write what you did (if it was some retraction test, print test etc.)
All right, I redownloaded the Git example config, uncomment the -z probe, horizontal_move_z: 20 and minimum_z_position: -5.
Added a new line to [extruder]: max_extrude_cross_section: 4.
After restart I made a DELTA_CALIBRATE and voilà 🙂 it’s working now.
I need to check some accelerations and if the extrusion length is set correctly.
(Raspberry Pi 3 B+, Kossel linear plus 2017, probe nr.2)
[printer]
kinematics: delta
max_velocity: 500
max_accel: 3000
max_z_velocity: 200
#delta_radius: 134.4
# if you want to DELTA_CALIBRATE you may need that
minimum_z_position: -5
[extruder]
rotation_distance: 33.333
Another aspect, sometimes idling/buffering a 0.5-1s (maybe the octolaps?).
Thanks
I would strongly recommend Fluidd over Octoprint:
https://www.lpomykal.cz/fluidd-installation/
Hi,
In the terminal when giving the command: “STATUS” the printer status is halted.
The reason is: Recv: // Option ‘rotation_distance’ in section ‘stepper_a’ must be specified
After some Googleing I see that klipper has changed from using “step_distance” to “rotation_distance”.
So for my understanding the “printer.cfg” file must be changed for all new users and the ones that update their Klipper to the latest version?
Is this right what i’m saying and is there a simple solution to recalculate from step_distance to rotation_distance?
Hi,
And on top of that they also have stopt with the arduino pin names.
So right now the whole printer.cfg is useless with the latest klipper version?
Best regards,
Raymond
Hi Raymond, I am aware of that problem (I have also updated Klipper on my Kossel).
I have a working configuration file, give me a few days and I will upload it.
If I won’t reply on Monday, please remind me to.
I have the exact same problem using mainsail with klipper. i went to print the delta calibration print from the klipper website, sliced it in prusa slicer using the built in kossel linear plus profile. went to print, made a small straight line then threw up this error Move exceeds maximum extrusion (0.751mm^2 vs 0.640mm^2) no idea what that means
Hi, check this article.
https://klipper.discourse.group/t/h-move-exceeds-maximum-extrusion/1189/2
Hai.. my home position is X: -2 Y: -0 Z: 279.01
why I got negative value specially in X:-2
how to solved this? (to get zero position X and Y)
Hi, have you already solved it?
until now I have not found a solution. I have tried delta calibration but still no luck
Hi, I can not download any of your suggested configurations
Hi, what do you mean by that?
Just click on the link and a zip file will be downloaded.
hi lukas,
i’ve uploaded the printer.cfg file, extruder work, hotend work, bed work, but when i’ve tried to home the axis the steppers make a big noise and a lot of vibration (VRRRRR) and they doesn’t stop at the switch. where i’m wrong? is a stepper problem?
Hi, provide more informations.
I have 2-3 different printer.cfg files on this website for different motherboard and driver configuration.
I do not now which one you used and what parts you have in your printer.
I use your Stock board (Trigorilla) and TMC2208 DIY drivers but added [controller_fan my_controller_fan]. But I got a conflict [output_pin my_pin]. Do this serve the same function? Which one should I use?
Hi, what conflict?
hi,
im a bit confused about z probe configuration. a month ago i crushed my original (old type) z probe because of no reaction. now i have type 2, everything configured as described, but when i start DELTA_CALIBRATE and try to hit the probe with my finger to avoid breaking it again, nothing happens.
any idea?
It is possible that Klipper ignores the probe some part of the height.
But I am not really sure, I have never tried it.
Hi there,
thank you for the great tutorial. Two Questions/Comments:
1. In 2.2 is written “dir_pin: ar55”. Your config says “dir_pin: !ar55”. Maybe a typo?
2. In 2.2 is written “round_probe_count: 9”. Your downloadable config uses “round_probe_count: 5”. A probe_count of 5 seems a bit low…
Sorry, got the number in my posting wrong: the probe count value is in 2.10 🙂
NP
Hi, thank you!
Yes, those are typos, I have about 5 different configs right know…
This is correct for stock drivers: dir_pin: !ar55.
For TMC drivers: dir_pin: ar55.
I have used 5 points, because it is enough for most of these printers.
For the 2208’s on an SKR 1.3, have you already setup everything in the config files for UART?
Exactly.
So I’ve got this working except the z-probe doesn’t trigger Klipper to stop when using assisted bed leveling. I have probe version 2. Any help would be greatly appreciated.
Stop what?
Does it crash into the bed or?…
Also there are 3 different configuration files on my page…
Which one do you use?
And also always use only DELTA_CALIBRATE with delta printers.
I see. Sorry, I was being silly; I just assumed you could use the assisted bed leveling to level the bed.
It usually does, but with delta printers, it is always better to use only a delta calibration.